Welcome

Thank you for visiting my blog. I hope you find interesting ideas and inspiring images. Any feedback or suggestions would be appreciated! Check out my facebook page.

About Me

My photo
My name is Gerrie Wydeven doing-business-as Wydeven Designs. I have been conducting this small GREEN business since 2004. Wydeven Designs, based in the Atlanta, Georgia area, sells CHAIRS, LOVESEATS, CHAISES, SETTEES and other fine, well-constructed refurbished upholstered pieces. I love to travel, cook, take photographs and generally follow style and decor topics as well!
Showing posts with label art. Show all posts

Thursday, August 15, 2013

Sharing - French Country Styling - Trumeau Mirrors

One of my faithful blog followers made a comment on a recent posting about French country style decorating link indicating that she has friends who are expert creators/painters of trumeau mirrors and asked if I'd like an "on-line" introduction. I have one such mirror/painting at home and had not known that this was what it was called:

tru•meau (or trumeaux)

Pronunciation: (trOO-mō'; Fr. try-mō'), [key]
n., 
—pl. -meauxPronunciation: (-mōz'; Fr. -mō'). [key]
 
1. a mirror having a painted or carved panel above or below the glass in the same frame. 
2. Archit.a column supporting a tympanum of a doorway at its center.

Read more: trumeau: meaning and definitions | Infoplease.com http://dictionary.infoplease.com/trumeau#ixzz2c3CvWRBU
She shared some of their great work with me as well as their "bios" and contact information. I, in turn, am happy to share this information with you! I understand that the artists are sisters and think their work is exceptional! ENJOY!


Brandi McKenna    bran1973@gmail.com
Brandi McKenna paints classical landscapes in oils. Working closely with her sister, Dustin Harlan, they design and create together one of a kind custom pieces, reminiscent of centuries past. They are available for commissioned works, classes, restoration, and repair.  Brandi, influenced by French and Dutch masters, paints the "picture" part of the trumeaux.

Dusti Harland   dmh6663@gmail.com

Being an artist and a maker of things comes naturally to Dusti who grew up in North Carolina surrounded by her mother's beautiful antiques, white damask linens, blue willow china, Francis The First flatware, and also in her father's basement workshop, playing with his tools. She would stare at the silver fretwork casserole stands atop the Duncan Phyfe buffet and long to take them into the workshop and cut them up and make them into her own creations.

Captivated by the  world where tools were skillfully wielded by her father, playing with scraps of wood and metal, she developed a love for creating, making things, and altering things into her own designs.

Her father's Shopsmith now sits in her workshop, a three thousand square foot historic brick building, where she and her sister, Brandi, put it to use collaborating on unique pieces like their own version of French Country trumeaux. That's also where she cuts up vintage silver to make jewelry and sculpture, carves beautiful bas reliefs in wood and cobbles bones, lighting and other reclaimed materials into richly textured functional sculpture for the home and body.

Bending things to her will by hook or by crook, or rather by saw and chisel, elbow grease, and countless dremel accessories, the world is her blank canvas.

Monday, January 14, 2013

Use of Personal Art in Home - Photo Canvasses

My photographs on canvasses - water theme.  Lighting in this area is limited so this photo is not as bright as I would like although it does seem I could hang a little straighter/better.
In the fall of 2012, we finished renovating our terrace level (aka basement) and we have been enjoying it ever since - link to renovation story. One of the decisions I had made was to maximize use of "personal art" in this space. Throughout my house, I have very nice pieces bought from varying venues including art galleries and art auctions (and, of course, estate and garage sales). I wanted to incorporate pieces that were more personal in two categories - my own photography work and art work created by friends and people I actually know.

In this posting, I am showing my photographs rendered on canvas that I used near the "foyer" area of this space and providing some tips and techniques of how to make this personal art option work for you.
Foyer area of renovated space.  I did end up placing a lamp on table and choose to place it in front of picture with least detail - not ideal but as workable as I can get it.
I made several decision before starting my search through 1000's of saved photo images to find four photos that would work together.
  • Finished canvas size was determined by availability from photo canvas vendors as well as the amount of space that I wanted to cover. I made my decision when I was able to pick up an online 50+% off deal for photo canvasses that included 20X24 - just big enough to work together for the space available and at a good price (about $50 per image - reduced from almost $130).
  • Image selection and composition was strongly influenced by my interest in using black and white images to create a more cohesive look. Since none of my photos had been taken in black and white, I had to find ones that could be converted to black and white and retain their interest and power.  I looked for strong value contrasts (lights and darks) and experimented with quite a few before selecting a theme and then the final four.
Once I found my photos I saved them and cropped to correct (20X24) size. This is a critical step because if you don't make adjustments to get to correct size, it will be done once you download to vendor site and corrections (image placement) are harder to make at that time.  It also forecasts how the image would look on canvas.

The other element to consider at this time is photo resolution - you need to make sure the image selected is sufficiently large to create a good image. I always take large resolution photos - at least I have for prior three years. Earlier images tended to be too small for a crisp 20X24 size.

I liked how this set turned out and how it looks on the wall.  For anyone who takes lots of photos, this is a nice personal art solution for the home.  This posting is linked here - Romantic Home

Saturday, December 22, 2012

Learn with me - IPhone Photography - Hipstamatic App

Here is the third in my series practicing new skills using my IPhone photography features with new apps.  See more introduction and other posting here.  In this posting, I am using the Hipstamatic App - link to website about app.  There is also a blog and a pinterest board that provides tips, techniques and awe-inspiring images - link to pinterest board.
Hipstamatic is a digital photography application for the Apple iPhone sold by Synthetic Corporation. It uses the iPhone's camera to allow the user to shoot square photographs, to which it applies a number of software filters to make the images look as though they were taken with an antique film camera. The user can choose among a number of effects which are presented in the application as simulated lensesfilms and flashes. Several of these are included with the application, while others may be acquired through an in-app purchase. Popular, the application has sold 1.4 million copies, as of November 2010.  source
As mentioned in this description, the application allows you to switch lenses, films, and flashes.  I do not like to use flashes in my photography so I haven't practiced with those at all - someday, perhaps.  I am practicing with the various combination of lenses and films which are easily switchable on the camera.  The best way to evaluate the results is just to shoot away and see what you get.  It is a fun and easy to use application.

Here are the results of using one film (Kodot) and all the free lenses that come with the basic app.  I am looking to add a black and white film but otherwise will probably stick with these.

The film Kodot is defined as follows:
Being a little rough around the edges never hurt anybody. Kodot's XGrizzled addes a vintage ‘just out of the dryer' look to your prints. source
I used this film with the following lenses - all are explained here - source:

  • John S.
  • Jane
  • Jimmy
  • Karmal Mark II
  • Buckhorst H1 
Here are the results:


I am not seeing a huge difference between the John S. and Jane lenses - the other lenses definitely give you a different look.  I will be experimenting more but this may be it before my holiday company comes today!  

HAPPY HOLIDAYS and happy photographing!  

Sunday, December 16, 2012

Learn With Me - IPhone Photography - ProHDR App

Last week, I attended a class at Chastain Park in the City of Atlanta to improve my skills using the IPhone photography function. My first posting on this subject link to my posting describes this class in more detail and includes the listing of photo apps that the instructor recommended. I am trying to familiarize myself with each one of them.

Today is a rainy, gloomy day in the area and I thought it would be a good opportunity to try out the ProHDR app. For a description of High Dynamic Range Imagery (HDR) and the difficulties cameras have in capturing light - check this source. The human eye has a sensitivity to light from dark to bright, so does a camera. The human eye however is about 10 times more sensitive to that “Dynamic Range” than most cameras can capture.  

The ProHDR app helps the camera adjust to the variations of light by taking two images and merging them. The 2.5 version I have dates from 2010 and is free. The newer 4.2 version is $1.99 - I may ramp up to this once I have learned how to use the freebie!
Thanks to Pro HDR, you no longer have to choose between a blown-out sky or a hopelessly dark foreground. Bringing high dynamic range photography to your iPhone, Pro HDR lets you capture an image exposed for the highlights and another exposed for the shadows. It then automatically aligns and blends the images, giving you a gorgeous HDR image up to 5 megapixels like nothing you've ever seen from such a .tiny device.  link to website.
I planned to take some outside photography but decided to just test it on inside shots and standing by the doorway looking out.  Since I HATE to use flashes in any of my photos, regardless of subject or location, I am thrilled with how nicely it handles low and varying light situations.  I love the results - here are some similar shots - taken with the basic IPhone camera and taken with ProHDR - see the difference!


Here are three examples of photos taken with my regular IPhone camera and those taken with ProHDR.  Since I hate to use a flash in any circumstance, I particularly like the difference in inside shots.
The app is VERY EASY to use (not true of all apps)! After opening, you have three choices - our instructor suggested using the "Auto HDR" mode and I am not familiar with the other two choices (Manual HDR or Library HDR).  Once opened on Auto HDR, you can take a photo as soon as you identify your subject; tap the screen, hold very still; and, watch the two images emerge and quickly combine.  At this point you can make up to five easy adjustments (I have used the "warmth" scale but seldom need the others) and then save the picture to your camera roll where you may want to executive another app to do cropping or other editing.

Here are some photos taken today and some preliminary lessons learned.  I have not cropped or done any other editing with these photos.  I also don't know how to remove the tag at the bottom??


Lessons Learned
  1.  It is REALLY important to hold that IPhone still to get the two shots of the exact same thing.  You can see some "fuzziness" in some of my photos - the result of my own shakiness.  The instructor suggested using something to steady the camera such as placing it on a solid surface or tripod-like item.
  2. The ProHDR camera does not have a zoom lens (at least not this version), so proximity to subject being photographed is important.
  3. Shots with animals or children (maybe even most adults) will be hard to do well because of the two photo process - even very slight movements will create blurs (which is too bad for Christmas Eve low-light gift opening).
  4. Best application for me thus far is inside still photography shots (no moving parts other than me) with inadequate lighting - it is magical how well this works!
I plan to continue to practice and may spend the $1.99 for the newer version which is supposedly faster and has a few other editing options.

This posting is linked to the following - A - Z link party.

Friday, December 14, 2012

Learn With Me - Iphone Photography - Introduction to Basic Camera

Panoramic View of Kitchen and Family Room using IPhone Camera - didn't know my basic camera could do this - now  I need to improve quality!
I have been a photography enthusiast all my life and always travel with a camera. In order to broaden my knowledge of the camera in my IPhone (4S version), I took a three day (nine hours) course at Chastain Art Center located in lovely Chastain Park in the city of Atlanta - link to website. The course "IPhone Photography workshop" is taught by Marie Matthews, an artist and avid Iphone photography fan - link to website. I not only learned much more about the camera already in my IPhone, but learned about and added a few apps for the class and now need to practice to get proficient at using all this new knowledge. I plan to use this blog as an opportunity to practice and help others learn with me!

Before we started, Marie asked us to add the following apps to our phone (or IPads).  As I explore these apps and practice, I will be discussing more of them.  This posting provides some basic photography tips that I found useful (or provided brand-new information to me) and a link to a good introductory tutorial.

  • Camera+
  • PhotoSync
  • PhotoWizard
  • Snapseed
  • Hipstamatic 
  • ProHDR 
  • Jazz
  • Pixlr Express 
  • Touch Retouch 
  • Superimpose 
  • PhotoSize
PHOTOGRAPHY TIPS   
  1. Keep the lens clean - use special cloths or soft fabric to clean the lens each day.
  2. Get close to your subject - best photos are 4-19" from subject.
  3. Hold phone with two hands close to chest to keep the camera still and avoid fuzzy images.
  4. Use focus feature on camera by tapping smaller area of image to "set" the area of emphasis and waiting for it to become clear before shooting (I was amazed by this feature).
  5. Set the "grid" option on to help create more balanced compositions and straighter photos.
  6. Use Panorama feature by engaging (options) and tapping camera to start and again to stop - moving slowly with the camera and holding at same level (again holding with two hands in front of chest helps with this).
  7. Use flash by moving to left for software flash and right for built-in flash - practice this to see if you want to use at all - most pictures look best in natural lighting (I agree with this).
  8. IPhoto images are about 1600 X 2000 pixels - ideal for enlarging to 10X10 but may be able to get as large as 20X20.
  9. Earplugs for IPhone have a remote clicker/camera button on the volume setting (I need to practice this one).
  10. You can access camera button without unlocking your screen - look for camera button on lower right hand side.
This was a good refresher for me and I plan to check out some tutorials to add to my knowledge.  link to a good introductory tutorial.  There are a TON out there!  Good luck!

Tuesday, December 4, 2012

More Touring and Shopping in the Low Country - Bluffton, SC


This is the second posting in a series about shopping and touring in the "Low Country" - that area of the Southeastern United States along the Atlantic Ocean coast.  It is distinguished by flat areas of sandy soil, barrier islands, and distinctive southern charm.  My husband and I just returned from a week-long visit to Hilton Head Island and spent time exploring areas off island as well as on.

Gallery in Bluffton
We stopped by the town of Bluffton, South Carolina, on two occasions.  On our first visit, we visited an historic house and participated in a walking tour of the historic district.  On the second visit, we returned for the weekly farmer's market and spent time visiting the shops and art galleries.  Bluffton is a wonderful town in a great setting!

Link to Town Website

The Town of Bluffton is located in Beaufort County, the southernmost coastal county in South Carolina.  It is situated on a high bluff overlooking the May River, a pristine waterway that has strongly contributed to the Town's history and continued success.  Bluffton is located just 12 miles west of Hilton Head Island, SC and approximately 20 miles northeast of Savannah, GA. 
Great old church on the bluffs overlooking the channel and harbor.
Our walking tour started at the Heyward House - link to website.
The walking tour was charming and our guide was very informed about the official and "unofficial" stories about the history of Bluffton.
Returned for the Thursday Farmer's Market.


I had a long conversation with the ladies at this shop.  We discussed various finishing techniques and I described my experiences with Annie Sloan Chalk Paint - something they had not tried.  Their work was beautiful!

We will be back!  

Sunday, December 2, 2012

Lowland Country Traveling and Shopping - Daufuskie Island


Arial Map of Daufuski Island
 My husband and I just returned from a week in Hilton Head, South Carolina - we had glorious weather and explored new sights and locations. One of our visits was to Daufuskie Island - located between Hilton Head Island and the South Carolina/Georgia coast - it is actually quite close to Savannah, Georgia. There is no bridge to Daufuskie, but there are several public ferries as well as tour companies that can take you there.

Most of Daufuskie Island is largely undeveloped.  The Island was originally the home of several huge rice and indigo plantations. Slaves were the primary residents for years. After emancipation, some stayed behind and found ways to make a living through fishing and agriculture.  The remnants of this group are called "gullah" and few remain on the island - most have migrated to other parts of the low country and beyond.  Here are several sites with information about Daufuskie Island - link to official website and wikipedia.
Daufuskie Island offers a glimpse of what other sea islands were like before bridges and causeways opened them to development. Most native residents of Daufuskie Island are decendants of freed slaves, who have made their living oystering and fishing for decades. The subject of Pat Conroy's novel, The Water Is Wide, Daufuskie Island has a timeless quality and is still accessible only by boat.
This posting illustrates some of the structures found in the Historic District which includes artisan shops and older structures.
Our guide "Charlie" told us that the owner/artist at the shop had sailed around the world in this blue boat - parked outside of his shop.  He also built the chalet structure on the property - available as a vacation rental.

The First Union African Baptist Church is the oldest building on the island and is used today for multi-denominal services.
We were fascinated by the huge tree.  The Mary Fields School is the schoolhouse where author Pat Conroy taught and he wrote the book - The Water is Wide - based on this experience (I read and enjoyed many years ago).
Some of the oldest structures are Gullah Houses.   My husband was one of the golf cart drivers - a common way for visitors to get around the island.


One of two well-known restaurants on island - not open day we were there. 
Dock on Daufuskie Island
 We enjoyed our stay and plan to come back with our family when they join us on Hilton Head Island in June of 2013 - this was a very interesting journey!

Wednesday, October 31, 2012

A Fall Visit to Gibbs Gardens in Ball Ground, Georgia

Last week, I joined friends from the Neely Farm Garden Club to visit Gibbs Gardens in Ball Ground, Georgia - about an hour north of the Atlanta metropolitan area - link to website.  The owner of this wonderful spot is James Gibbs.
Jim Gibbs traveled for 15 years covering the nation and the world viewing gardens of every style and decided that he wanted to design and build a world class garden. He spent six years looking for a suitable site with a strong source of water and beautiful mature trees covering a rolling topography. It was truly "a dream come true" when he found the most beautiful site in the nation to construct the garden. The property is 292 acres and the house and gardens include 220 acres, making it one of the nation's largest residential estate gardens.
It was a beautiful day and we were not the only ones with this great idea.  The spaciousness of the gardens, however, made you feel like this was your private estate - a wonderful idea!

I took a lot of photos and these are just some highlights - the gardens are definitely worth the trip and I plan to go back for other seasonal visits!


This was a wonderful visit with good friends.  We even ate in the gardens - great sandwiches and a nice outdoor "picnic-like" setting.

Monday, October 8, 2012

Norcross Art Festival - Home Sweet Home

Norcross Arts Festival in historic downtown area 
My mailing address is Norcross, Georgia, although our particular area has recently become its own city - Peachtree Corners (how unique is that) - but Norcross remains the mailing address.  So this blog is about my home town.  It is a suburb of Atlanta - about 22 miles from city center which is considered close-in given the huge area that the Atlanta metropolitan area occupies.  Here is a tell-all website for the city of Norcross including its history - link to website - an excerpt:
Georgia's first rail tracks were laid in the mid-1830's, and during the years of post-Civil War Reconstruction, rail expansion led to town expansion.  In 1869, Atlanta entrepreneur J.J. Thrasher purchased 250 acres around the first stop north along the proposed Richmond Danville lines, and a year later, the area was incorporated. Thrasher named the new town for his good friend and fellow entrepreneur, Jonathan Norcross, who was also the fourth mayor of Atlanta.
Over the weekend,  the annual Norcross Arts Festival in the historic downtown area was scheduled.  We had only once been to this event briefly before and thought we'd meander over on Sunday afternoon.  The weather had turned chilly for this area (mid 60's) so it definitely felt like fall.  We were VERY impressed with the scope and variety of the event and it was very well attended.

The Norcross Arts Festival's website includes much information about the event - link to website.
The Norcross Art Fest, the first sparkling member of our Splash Festivals family, will celebrate its ninth season on October 6 and 7, 2012. The popular Art Fest, with crowds of 60,000 festival goers in 2011, makes its home on the charming streets of historic downtown Norcross. Whimsical and wildly colorful artisans from across the country exhibit their imaginative artwork amidst the enchanting shops, eateries and boutiques in the City of Norcross. 
Heading towards art displays.

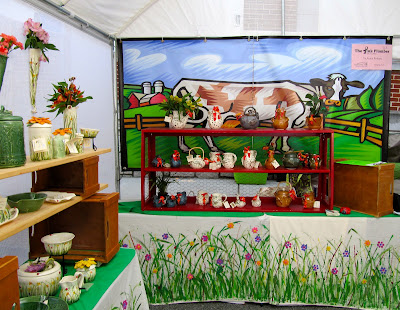
I bought several Christmas gifts and picked up vendor cards for future discussions.  Several vendors have Estsy shops (as I do) so that may be a way to stay connected.  Here are some images of the event - we will definitely put this on our calendars for future visits.

I also discovered a shop selling Annie Sloan Chalk Paints (Yaaah) and promised to come back to do a "blog exclusive" on her shop.


Here is the ASCP Shop - I will be visiting soon to make some purchases and hear more about her shop. 
Love this idea and wish I had known - I would have donated one of my chairs.
 This was a wonderful stop for us and an impressive venue for our hometown!