Welcome

Thank you for visiting my blog. I hope you find interesting ideas and inspiring images. Any feedback or suggestions would be appreciated! Check out my facebook page.

About Me

My photo
My name is Gerrie Wydeven doing-business-as Wydeven Designs. I have been conducting this small GREEN business since 2004. Wydeven Designs, based in the Atlanta, Georgia area, sells CHAIRS, LOVESEATS, CHAISES, SETTEES and other fine, well-constructed refurbished upholstered pieces. I love to travel, cook, take photographs and generally follow style and decor topics as well!
Showing posts with label photography. Show all posts

Monday, January 14, 2013

Use of Personal Art in Home - Photo Canvasses

My photographs on canvasses - water theme.  Lighting in this area is limited so this photo is not as bright as I would like although it does seem I could hang a little straighter/better.
In the fall of 2012, we finished renovating our terrace level (aka basement) and we have been enjoying it ever since - link to renovation story. One of the decisions I had made was to maximize use of "personal art" in this space. Throughout my house, I have very nice pieces bought from varying venues including art galleries and art auctions (and, of course, estate and garage sales). I wanted to incorporate pieces that were more personal in two categories - my own photography work and art work created by friends and people I actually know.

In this posting, I am showing my photographs rendered on canvas that I used near the "foyer" area of this space and providing some tips and techniques of how to make this personal art option work for you.
Foyer area of renovated space.  I did end up placing a lamp on table and choose to place it in front of picture with least detail - not ideal but as workable as I can get it.
I made several decision before starting my search through 1000's of saved photo images to find four photos that would work together.
  • Finished canvas size was determined by availability from photo canvas vendors as well as the amount of space that I wanted to cover. I made my decision when I was able to pick up an online 50+% off deal for photo canvasses that included 20X24 - just big enough to work together for the space available and at a good price (about $50 per image - reduced from almost $130).
  • Image selection and composition was strongly influenced by my interest in using black and white images to create a more cohesive look. Since none of my photos had been taken in black and white, I had to find ones that could be converted to black and white and retain their interest and power.  I looked for strong value contrasts (lights and darks) and experimented with quite a few before selecting a theme and then the final four.
Once I found my photos I saved them and cropped to correct (20X24) size. This is a critical step because if you don't make adjustments to get to correct size, it will be done once you download to vendor site and corrections (image placement) are harder to make at that time.  It also forecasts how the image would look on canvas.

The other element to consider at this time is photo resolution - you need to make sure the image selected is sufficiently large to create a good image. I always take large resolution photos - at least I have for prior three years. Earlier images tended to be too small for a crisp 20X24 size.

I liked how this set turned out and how it looks on the wall.  For anyone who takes lots of photos, this is a nice personal art solution for the home.  This posting is linked here - Romantic Home

Saturday, December 22, 2012

Learn with me - IPhone Photography - Hipstamatic App

Here is the third in my series practicing new skills using my IPhone photography features with new apps.  See more introduction and other posting here.  In this posting, I am using the Hipstamatic App - link to website about app.  There is also a blog and a pinterest board that provides tips, techniques and awe-inspiring images - link to pinterest board.
Hipstamatic is a digital photography application for the Apple iPhone sold by Synthetic Corporation. It uses the iPhone's camera to allow the user to shoot square photographs, to which it applies a number of software filters to make the images look as though they were taken with an antique film camera. The user can choose among a number of effects which are presented in the application as simulated lensesfilms and flashes. Several of these are included with the application, while others may be acquired through an in-app purchase. Popular, the application has sold 1.4 million copies, as of November 2010.  source
As mentioned in this description, the application allows you to switch lenses, films, and flashes.  I do not like to use flashes in my photography so I haven't practiced with those at all - someday, perhaps.  I am practicing with the various combination of lenses and films which are easily switchable on the camera.  The best way to evaluate the results is just to shoot away and see what you get.  It is a fun and easy to use application.

Here are the results of using one film (Kodot) and all the free lenses that come with the basic app.  I am looking to add a black and white film but otherwise will probably stick with these.

The film Kodot is defined as follows:
Being a little rough around the edges never hurt anybody. Kodot's XGrizzled addes a vintage ‘just out of the dryer' look to your prints. source
I used this film with the following lenses - all are explained here - source:

  • John S.
  • Jane
  • Jimmy
  • Karmal Mark II
  • Buckhorst H1 
Here are the results:


I am not seeing a huge difference between the John S. and Jane lenses - the other lenses definitely give you a different look.  I will be experimenting more but this may be it before my holiday company comes today!  

HAPPY HOLIDAYS and happy photographing!  

Sunday, December 16, 2012

Learn With Me - IPhone Photography - ProHDR App

Last week, I attended a class at Chastain Park in the City of Atlanta to improve my skills using the IPhone photography function. My first posting on this subject link to my posting describes this class in more detail and includes the listing of photo apps that the instructor recommended. I am trying to familiarize myself with each one of them.

Today is a rainy, gloomy day in the area and I thought it would be a good opportunity to try out the ProHDR app. For a description of High Dynamic Range Imagery (HDR) and the difficulties cameras have in capturing light - check this source. The human eye has a sensitivity to light from dark to bright, so does a camera. The human eye however is about 10 times more sensitive to that “Dynamic Range” than most cameras can capture.  

The ProHDR app helps the camera adjust to the variations of light by taking two images and merging them. The 2.5 version I have dates from 2010 and is free. The newer 4.2 version is $1.99 - I may ramp up to this once I have learned how to use the freebie!
Thanks to Pro HDR, you no longer have to choose between a blown-out sky or a hopelessly dark foreground. Bringing high dynamic range photography to your iPhone, Pro HDR lets you capture an image exposed for the highlights and another exposed for the shadows. It then automatically aligns and blends the images, giving you a gorgeous HDR image up to 5 megapixels like nothing you've ever seen from such a .tiny device.  link to website.
I planned to take some outside photography but decided to just test it on inside shots and standing by the doorway looking out.  Since I HATE to use flashes in any of my photos, regardless of subject or location, I am thrilled with how nicely it handles low and varying light situations.  I love the results - here are some similar shots - taken with the basic IPhone camera and taken with ProHDR - see the difference!


Here are three examples of photos taken with my regular IPhone camera and those taken with ProHDR.  Since I hate to use a flash in any circumstance, I particularly like the difference in inside shots.
The app is VERY EASY to use (not true of all apps)! After opening, you have three choices - our instructor suggested using the "Auto HDR" mode and I am not familiar with the other two choices (Manual HDR or Library HDR).  Once opened on Auto HDR, you can take a photo as soon as you identify your subject; tap the screen, hold very still; and, watch the two images emerge and quickly combine.  At this point you can make up to five easy adjustments (I have used the "warmth" scale but seldom need the others) and then save the picture to your camera roll where you may want to executive another app to do cropping or other editing.

Here are some photos taken today and some preliminary lessons learned.  I have not cropped or done any other editing with these photos.  I also don't know how to remove the tag at the bottom??


Lessons Learned
  1.  It is REALLY important to hold that IPhone still to get the two shots of the exact same thing.  You can see some "fuzziness" in some of my photos - the result of my own shakiness.  The instructor suggested using something to steady the camera such as placing it on a solid surface or tripod-like item.
  2. The ProHDR camera does not have a zoom lens (at least not this version), so proximity to subject being photographed is important.
  3. Shots with animals or children (maybe even most adults) will be hard to do well because of the two photo process - even very slight movements will create blurs (which is too bad for Christmas Eve low-light gift opening).
  4. Best application for me thus far is inside still photography shots (no moving parts other than me) with inadequate lighting - it is magical how well this works!
I plan to continue to practice and may spend the $1.99 for the newer version which is supposedly faster and has a few other editing options.

This posting is linked to the following - A - Z link party.

Friday, December 14, 2012

Learn With Me - Iphone Photography - Introduction to Basic Camera

Panoramic View of Kitchen and Family Room using IPhone Camera - didn't know my basic camera could do this - now  I need to improve quality!
I have been a photography enthusiast all my life and always travel with a camera. In order to broaden my knowledge of the camera in my IPhone (4S version), I took a three day (nine hours) course at Chastain Art Center located in lovely Chastain Park in the city of Atlanta - link to website. The course "IPhone Photography workshop" is taught by Marie Matthews, an artist and avid Iphone photography fan - link to website. I not only learned much more about the camera already in my IPhone, but learned about and added a few apps for the class and now need to practice to get proficient at using all this new knowledge. I plan to use this blog as an opportunity to practice and help others learn with me!

Before we started, Marie asked us to add the following apps to our phone (or IPads).  As I explore these apps and practice, I will be discussing more of them.  This posting provides some basic photography tips that I found useful (or provided brand-new information to me) and a link to a good introductory tutorial.

  • Camera+
  • PhotoSync
  • PhotoWizard
  • Snapseed
  • Hipstamatic 
  • ProHDR 
  • Jazz
  • Pixlr Express 
  • Touch Retouch 
  • Superimpose 
  • PhotoSize
PHOTOGRAPHY TIPS   
  1. Keep the lens clean - use special cloths or soft fabric to clean the lens each day.
  2. Get close to your subject - best photos are 4-19" from subject.
  3. Hold phone with two hands close to chest to keep the camera still and avoid fuzzy images.
  4. Use focus feature on camera by tapping smaller area of image to "set" the area of emphasis and waiting for it to become clear before shooting (I was amazed by this feature).
  5. Set the "grid" option on to help create more balanced compositions and straighter photos.
  6. Use Panorama feature by engaging (options) and tapping camera to start and again to stop - moving slowly with the camera and holding at same level (again holding with two hands in front of chest helps with this).
  7. Use flash by moving to left for software flash and right for built-in flash - practice this to see if you want to use at all - most pictures look best in natural lighting (I agree with this).
  8. IPhoto images are about 1600 X 2000 pixels - ideal for enlarging to 10X10 but may be able to get as large as 20X20.
  9. Earplugs for IPhone have a remote clicker/camera button on the volume setting (I need to practice this one).
  10. You can access camera button without unlocking your screen - look for camera button on lower right hand side.
This was a good refresher for me and I plan to check out some tutorials to add to my knowledge.  link to a good introductory tutorial.  There are a TON out there!  Good luck!

Thursday, May 31, 2012

Renting a Magical Rural House near Amsterdam

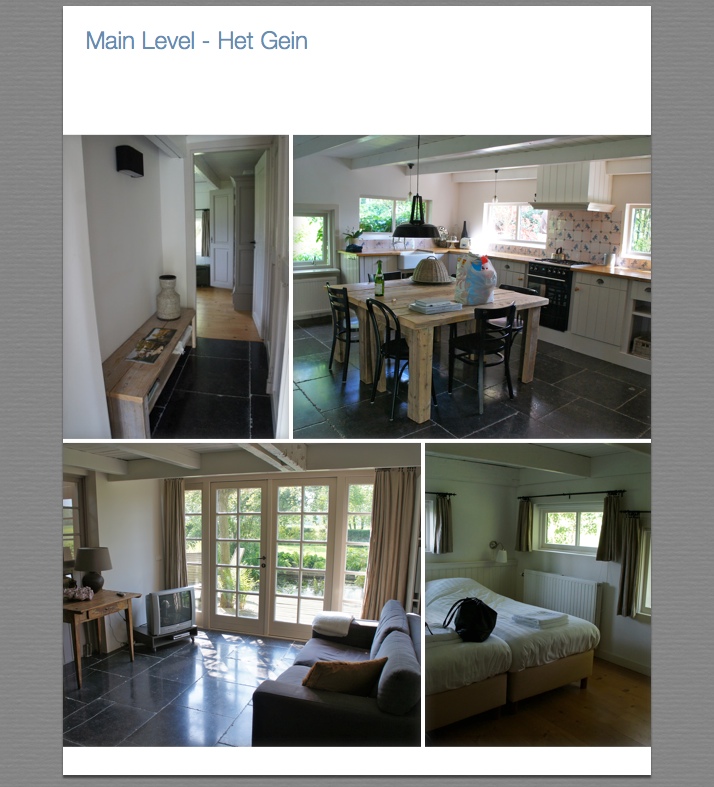
Het Gein is the name of the property - see website
I am continuing my travel theme with a discussion about the wonderful farm/summerhouse we rented  just last week located in a rural area only 200 meters from the Amsterdam city border.  It was magical!

The visit to Holland was added to the week we spent in the Normandy area of France.  My sister and I wanted to explore more of the land of our birth.  We were born in the southern part of Holland (Uden, Noord Brabant) and with our parents and three other siblings emigrated to America when we were in elementary school - quite a while ago.  Although we had both spent several vacations in southern Holland, we had never devoted much time to this part of the country.  So, for this trip, we (with willing husbands in tow) wanted to explore the Amsterdam and other near-by areas.

I found this house on the Home Away website link and thought it sounded too good to be true.  The cost was much less than renting an apartment in Amsterdam and it had two bedrooms with bathrooms en-suite.  Even better, there was a place to park our car since we did want to keep it for our non-city excursions.

The descriptions and history were intriguing:
The B&B has a rich history: until the 60’s the summerhouse was a cattle shed with hay-loft and the farm was leased by a farmer’s family. Later on the land was sold by the Amsterdam municipality to the famous Dutch sculptor Nel van Lith. On the old hay-loft she gave sculptor lessons to our Queen Beatrix (then Princess). 

From 1995 a garden architect lived here and she designed the English/French garden that is still intact today. Since May 2010 the B&B Het Gein is situated in the summerhouse.
Getting there was a little tricky for the Renault Trafic (HUGE tank-like car) we had rented in France and continued to keep for this week.  My poor husband had to navigate some very narrow roads to get to the property which is located on the River Gein and surrounded on several sides by small canals.  Once established in our new home, we figured out a system for getting in and out of the gate which involved traffic control by my brother-in-law and the requirement that my sister and I stay as far out of the way as possible.

The original property was built in 1865 as a farm with several attached and detached outbuildings.  Our wonderful hosts, Stephanie and Raymond, lived with their two beautiful daughters and very affectionate dog, Pukie, in what was once the cattle shed - attached to the farmhouse with limited separation.  The structure reminded us of the old farmhouse with similar accommodations for milk cows that our grandparents had in Holland when we were young.


The house we lived in was once a home for pigs (can't bear to call it a pig-stye) and a hay loft.  It had been beautifully renovated with all necessary modern conveniences including nicely designed bathrooms and a great country kitchen.  The true magic of the place, however, is the upper loft (former hay-loft) which is open and spacious with lots of windows and the extensive gardens that are both formal and unstructured in design - with plants and trees and places to sit and dream all over!

In trying to find just a few dozen photos to best demonstrate this magic place, I discovered that I had taken over 300 of the place and the neighborhood - and they are all great.  Here are a sample:


The artist - jan Van Kempen - lived next door - website
I  bought this pencil and charcoal sketch by Jan Ven Kempen.  He showed us the house located across from his garden on the Gein River.  He made this sketch during winter.
Sisters on the deck behind our home  
Front view of house

Wednesday, May 30, 2012

Driving in France - A Brief Photo Journal


I just returned from a week in Normandy (and a week in Holland) and have a lot of stories to tell as well as photos to use/share.  In France, my husband and I were part of a group of ten coming from Georgia, Illinois, Maryland and Connecticut.  On an earlier trip together, we had rented a Peugeot Trafic which is a tank-like oversized car that holds up to eight pretty comfortably.  With two Trafics between us, we could travel luxuriously.

My husband and our travel coordinator were the designated drivers - there were no others begging to do this job!   The vehicles performed admirably although there were size challenges in driving narrow country roads as well as parking.  The size of many roads particularly in the centers of older towns and cities were definitely not designed for this size car - in fact, they were really not designed for cars at all.   Parking spots as well as underground structures were not always accessible.   Our drivers were our heroes!

Tim was fond of saying that he was using JPS - Jack Positing System.  They tag-teamed throughout the area.

After this week, we took one of the Trafics to Holland - a much longer total distance and more challenging driving and parking to come!

Sunday, March 11, 2012

A Visit to the Atlanta Botanical Gardens - Camera Practice!


My husband bought me a new camera for Christmas - a Sony NEX C3 with 18-55 mm interchangeable lens link to company website.  I LOVE this camera and used it extensively on our recent trip to Portugal.  I had not, however, practiced taking close-ups and using some of the more "creative" features that this great camera offers.  So, on this lovely sunday in March, I suggested we visit the Atlanta Botanical Gardens link to website and practice "our" photography.   This is a lovely venue and I have only recently become a member.  

The day was perfect for photography - a little overcast which allowed the colors of the flowers to shine through without too many shadows and overly intense light.  This camera has a "creativity" setting that is a lot of fun to use.  It allows you to take the photo in a number of modes such as highlighting only one color, sepia or black and white, overly intense "comedic" colors and others.   I practiced taking photos of particular flowers/plants in a variety of modes - the results are very interesting!
Creatively Settings, Reds, Bright Colors, Black and White Monocrome and Over saturated Colors
I found that the camera takes good close-in shots although the zoom (18-55mm) of the lens that is sold with the camera does not have the range that my prior little point and shoot had.  Sony's camera does allow you to buy and use their full range of DSLR lenses.  I'm not sure I want to lug around other lenses so I'll going to try to make do with what I have here.  

Creativity Settings
I did find that the "intelligent" setting (based on your actions - what you point at and focus) allowed me to take close-ups as well as the specific setting for "macro" photography - which is nice to know and does make spontaneous photographing easier.

Another interesting group - the photo on top-right was actually a "red setting" this plant did not read fully read by my camera which resulted in this two-toned photo
Photos in "red" setting - there is my husband Tim in his red jacket. 


Photos taken by my husband!